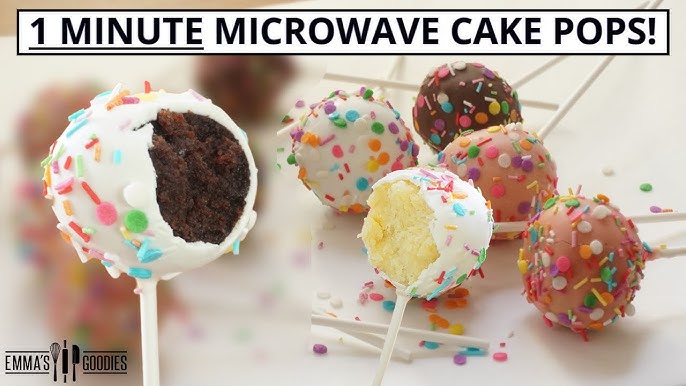
Welcome to https://tastetrove.net/, your go-to destination for simple, delicious recipes that bring joy to your kitchen! If you’re new to baking or looking for a fun, bite-sized dessert to impress at parties, cake pops are the perfect treat. These delightful, lollipop-like sweets are not only adorable but also incredibly easy to make. In this comprehensive guide, we’ll walk you through an easy cake pop recipe for beginners that delivers irresistible treats in minutes. Whether it’s for a birthday, holiday, or just a sweet craving, this recipe will have you creating professional-looking cake pops with minimal effort. Let’s dive in!
What Are Cake Pops?
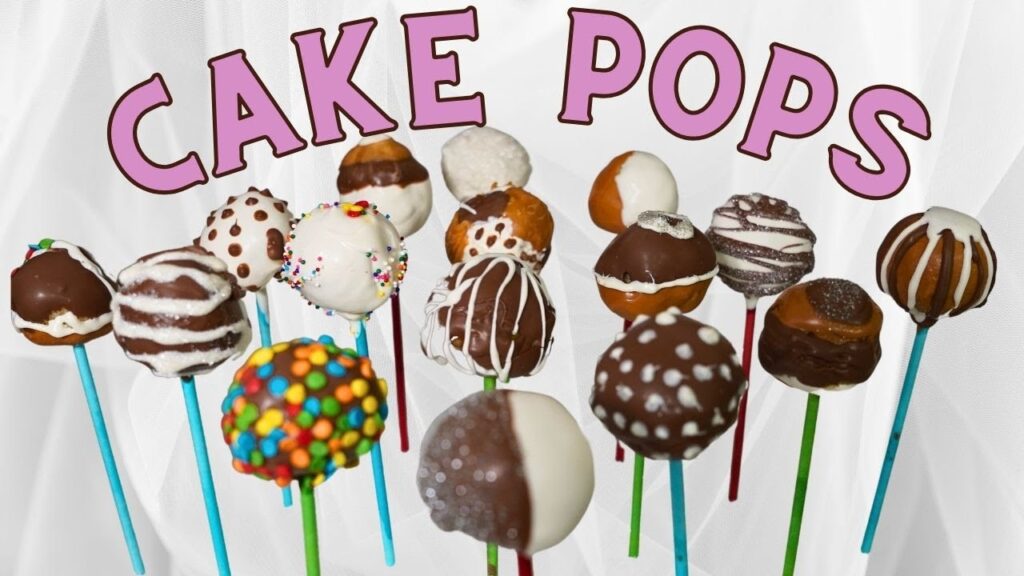
Cake pops are small, round balls of cake mixed with frosting, coated in chocolate or candy melts, and served on a stick. They’re customizable, portable, and perfect for any occasion. Popularized by bakers like Bakerella, cake pops have become a staple at parties, baby showers, and bake sales. The best part? You don’t need to be a professional baker to make them! With a few simple ingredients and tools, you can create these sweet treats at home.
For more dessert inspiration, check out our Classic Chocolate Cupcake Recipe on Tastetrove!
A Cake Pop Recipe is the perfect way to turn a simple cake into fun, bite-sized treats that everyone loves. Made by crumbling baked cake and mixing it with frosting, the mixture is then rolled into small balls, placed on sticks, and coated with melted chocolate or candy melts. From there, you can decorate them with sprinkles, drizzles, or custom designs to suit any occasion. Cake pop recipes are versatile—you can use boxed cake mix for convenience or bake from scratch for a more personalized flavor. Whether for birthdays, holidays, or just a sweet snack, a cake pop recipe is an easy and creative baking project that delivers delightful results every time.
Why You’ll Love This Cake Pop Recipe
This beginner-friendly recipe is designed to be quick, affordable, and foolproof. Here’s why it’s perfect for you:
- Minimal Ingredients: Uses pantry staples you likely already have.
- No Fancy Equipment: Basic tools like a mixing bowl and microwave will do.
- Customizable: Choose your favorite cake flavors, frostings, and decorations.
- Kid-Friendly: A fun project for family baking sessions.
- Quick Prep: Ready in under an hour, including chilling time.
Ready to get started? Let’s gather the ingredients and tools you’ll need.
A Cake Pop Recipe is a fun and simple way to make bite-sized desserts that everyone will enjoy, and a Cake Pop Recipe can be made with either a boxed cake mix or homemade cake. By following a Cake Pop Recipe, you can crumble baked cake, mix it with frosting, and shape it into small balls before placing them on sticks. A Cake Pop Recipe also guides you through dipping the pops into melted chocolate or candy melts for a smooth coating. With a Cake Pop Recipe, you can get creative by adding sprinkles, drizzles, or themed decorations for any celebration. No matter your baking skills, a Cake Pop Recipe is the perfect choice for making sweet, festive treats in minutes.
Ingredients for Easy Cake Pops
For about 20-25 cake pops, you’ll need:
For the Cake Base:
- 1 box (15.25 oz) cake mix (vanilla, chocolate, or your favorite flavor)
- Ingredients listed on the cake mix box (typically eggs, oil, and water)
- 1/3 cup store-bought or homemade frosting (vanilla or chocolate work great)
For the Coating and Decoration:
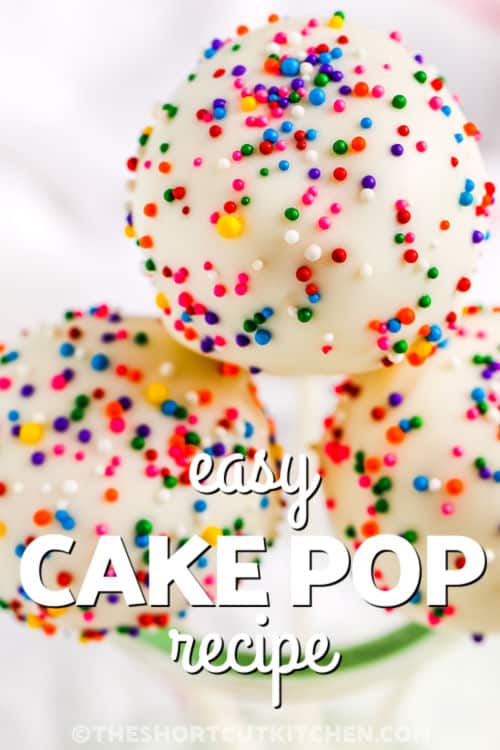
- 16 oz candy melts (white, milk chocolate, or colored; we recommend Wilton Candy Melts)
- 1-2 tbsp vegetable oil (optional, for smoother coating)
- Sprinkles, edible glitter, or crushed nuts for decoration
- 20-25 lollipop sticks
Optional Add-Ins:
- Food coloring (for colored candy melts)
- Flavor extracts (like almond or lemon for extra flair)
Pro Tip: If you prefer homemade cake, try our Moist Vanilla Cake Recipe for a from-scratch option!
Equipment Needed
- 9×13-inch baking pan
- Mixing bowls
- Electric mixer or whisk
- Microwave-safe bowl or double boiler
- Baking sheet lined with parchment paper
- Styrofoam block or cake pop stand (for drying)
Don’t have a cake pop stand? A block of Styrofoam from Amazon works perfectly to hold your cake pops while they set.
Step-by-Step Instructions
Follow these simple steps to create your cake pops. We’ve broken it down to ensure success, even if it’s your first time!
Step 1: Bake the Cake
- Preheat your oven according to the cake mix instructions (usually 350°F/175°C).
- Prepare the cake batter as directed on the box. For a richer flavor, swap water for milk or add an extra egg.
- Pour the batter into a greased 9×13-inch baking pan and bake as instructed (typically 25-30 minutes).
- Once baked, let the cake cool completely. This is crucial to avoid a mushy texture when mixing with frosting.
Tip: Speed up cooling by placing the cake in the fridge for 15-20 minutes.
A Cake Pop Recipe is a beginner-friendly dessert idea, and a Cake Pop Recipe allows you to transform simple cake into creative, bite-sized treats. With a Cake Pop Recipe, you just crumble cake, mix it with frosting, and shape the mixture into balls. After following a Cake Pop Recipe, you can dip the pops in candy melts or chocolate for a smooth, glossy finish. A Cake Pop Recipe also makes it easy to decorate with sprinkles, drizzles, or custom designs for any occasion. Whether for parties, holidays, or everyday fun, a Cake Pop Recipe ensures your treats are as delicious as they are eye-catching.
Step 2: Crumble the Cake
- Once cooled, break the cake into a large mixing bowl. Use your hands or a fork to crumble it into fine crumbs. Ensure there are no large chunks.
- If the cake has a crispy edge, trim it off to keep the texture consistent.
Step 3: Mix with Frosting
- Add 1/3 cup of frosting to the crumbled cake. Start with a small amount and mix with your hands or a spoon until the mixture holds together when squeezed.
- The mixture should feel like soft dough—moist but not overly sticky. Add more frosting, a tablespoon at a time, if needed.
Beginner Tip: Too much frosting makes the cake pops dense and greasy. Less is more!
A Cake Pop Recipe is the perfect solution for making quick and delicious desserts, and a Cake Pop Recipe can be customized with endless flavors and decorations. By using a Cake Pop Recipe, you can start with boxed cake mix or homemade cake and turn it into fun, handheld pops. A Cake Pop Recipe makes it simple to roll cake and frosting into smooth balls before adding sticks. With a Cake Pop Recipe, you can dip each pop into melted chocolate or candy melts for a professional finish. Whether you’re baking for kids, parties, or holidays, a Cake Pop Recipe guarantees tasty, eye-catching results every time.
Step 4: Form the Cake Balls
- Scoop out tablespoon-sized portions of the cake mixture using a cookie scoop or spoon.
- Roll each portion into a smooth ball with your hands. Aim for uniformity (about 1-1.5 inches in diameter).
- Place the balls on a parchment-lined baking sheet and chill in the fridge for 15-20 minutes or the freezer for 10 minutes to firm up.
For more shaping tips, check out our Cookie Dough Truffles Guide for similar techniques!
Step 5: Prepare the Candy Coating
- Place the candy melts in a microwave-safe bowl. Microwave in 30-second intervals, stirring after each, until fully melted and smooth.
- If the coating is too thick, add 1-2 tablespoons of vegetable oil to thin it out for easier dipping.
- If using food coloring, add a few drops to the melted candy and stir well.
Note: Candy melts are easier for beginners than tempered chocolate. Find tips on tempering chocolate at King Arthur Baking.
Step 6: Dip the Cake Pops
- Dip the tip of a lollipop stick into the melted candy (about 1/2 inch) and insert it halfway into a chilled cake ball. This helps secure the stick.
- Dip the entire cake ball into the melted candy, ensuring it’s fully coated. Gently tap the stick against the bowl to remove excess coating.
- Immediately add sprinkles or decorations before the coating sets.
- Place the cake pop upright in a Styrofoam block or cake pop stand to dry.
Pro Tip: Work in small batches to keep the coating smooth and the cake balls cold.
Step 7: Let Them Set
- Allow the cake pops to set at room temperature for about 10-15 minutes or until the coating is firm.
- If you’re in a rush, pop them in the fridge for 5 minutes, but avoid prolonged chilling to prevent cracking.
Step 8: Serve and Enjoy!
Your cake pops are ready to serve! Store them in an airtight container at room temperature for up to 3 days or in the fridge for a week. For gifting, wrap each pop in a small cellophane bag tied with a ribbon.
Customization Ideas
One of the best things about cake pops is how versatile they are! Here are some fun ways to make them your own:
- Flavors: Try red velvet cake with cream cheese frosting or lemon cake with white chocolate coating.
- Decorations: Use edible gold dust, crushed Oreos, or mini chocolate chips for texture.
- Themes: Create holiday-themed pops with red and green sprinkles for Christmas or pastel colors for Easter.
- Drizzles: Melt a contrasting color of candy melts and drizzle over the set pops for a professional look.
Explore more decorating ideas in our Festive Dessert Ideas article!
Troubleshooting Common Issues
Even beginners can run into hiccups. Here’s how to fix common cake pop problems:
- Cake Balls Falling Off Sticks: Ensure the balls are chilled before dipping, and don’t skip dipping the stick in candy melt first.
- Cracked Coating: Avoid extreme temperature changes. Let the cake balls come to room temperature before dipping, and don’t refrigerate for too long after coating.
- Lumpy Coating: Thin the candy melts with a bit of vegetable oil, and ensure they’re fully melted.
- Too Crumbly: Add a touch more frosting to the cake mixture.
For more baking tips, visit The Spruce Eats for expert advice.
Serving and Storage Tips
- Serving: Display cake pops in a decorative stand or wrapped as party favors. They’re perfect for birthdays, weddings, or bake sales.
- Storage: Store in an airtight container. Room temperature is fine for short-term (2-3 days), but refrigerate for longer storage (up to a week). Freeze uncoated cake balls for up to a month.
- Transporting: Secure pops in a Styrofoam block or lay flat in a container to avoid smudging.
Why Cake Pops Are Perfect for Beginners
This recipe is designed with simplicity in mind. Using a box cake mix saves time, and store-bought frosting ensures consistent results. The process is forgiving, and even imperfect cake pops taste delicious! Plus, the creative possibilities make it a fun project for bakers of all ages.
Pairing Suggestions
Serve your cake pops with:
- A refreshing Homemade Lemonade for a summer party.
- Hot cocoa for a cozy winter treat.
- Fresh fruit skewers for a balanced dessert table.
Final Thoughts
Making cake pops is a delightful way to unleash your creativity in the kitchen. With this easy recipe, you’ll have irresistible treats ready in minutes, perfect for any occasion. At Tastetrove, we’re all about making baking accessible and fun, so give this recipe a try and share your creations with us! Tag us on social media or leave a comment on our site.
For more beginner-friendly recipes, explore our Baking Basics Collection or dive into Allrecipes for additional inspiration. Happy baking!
Here’s a set of FAQs and recommended products related to “Easy Cake Pop Recipe for Beginners: Irresistible Treats in Minutes!”
📌 FAQs about Easy Cake Pop Recipe for Beginners
Q1: What ingredients do I need for an easy cake pop recipe?
A: You’ll typically need baked cake (boxed mix or homemade), frosting, candy melts or chocolate, and lollipop sticks. Optional decorations like sprinkles can make them even more fun.
Q2: Can I use boxed cake mix for cake pops?
A: Yes! Boxed cake mix is beginner-friendly and works perfectly for cake pops. Just bake, crumble, and mix with frosting.
Q3: How do I keep cake pops from falling off the sticks?
A: Dip the stick tip in melted chocolate before inserting it into the cake ball. This helps “glue” it in place and prevents slipping.
Q4: What’s the best way to coat cake pops smoothly?
A: Melt candy melts or chocolate in a deep, narrow cup. Dip each cake pop in one motion, then gently tap off excess coating.
Q5: Do cake pops need to be refrigerated?
A: Yes, refrigerate them until the coating sets. If made with cream cheese frosting, always store them in the fridge.
Q6: How long do cake pops last?
A: Cake pops last up to 3–4 days at room temperature (if coated) or up to a week when refrigerated.
Q7: Can I make cake pops ahead of time?
A: Absolutely! You can freeze undecorated cake balls for up to 6 weeks and dip them in coating when ready to serve.
🎂 Recommended Products for Easy Cake Pop Making
- Babycakes Cake Pop Maker – A beginner-friendly machine that bakes cake pops quickly without needing to roll them by hand.The Babycakes Cake Pop Maker is a must-have tool for anyone who loves creating bite-sized treats with ease and convenience. Designed for beginners and pros alike, this compact machine allows you to bake perfectly round cake pops in just minutes, eliminating the need for rolling and shaping by hand. Its nonstick baking plates ensure easy release and quick cleanup, while the included accessories like sticks and a fork help make the decorating process simple and fun. Whether you’re preparing snacks for a party, holiday gathering, or just a sweet family treat, the Babycakes Cake Pop Maker turns ordinary cake batter into delightful, uniform pops that are ready to dip, decorate, and enjoy.
- Wilton Candy Melts – Smooth, colorful coating for dipping and decorating cake pops.Wilton Candy Melts are a favorite choice for decorating cake pops, candies, and desserts, thanks to their smooth texture and wide variety of vibrant colors. These versatile wafers melt easily in the microwave or a melting pot, making them perfect for dipping, drizzling, or molding into fun shapes. With their consistent coverage and glossy finish, Wilton Candy Melts give your treats a professional bakery-style look without the hassle. They come in a range of flavors and seasonal colors, so you can match any theme or occasion, whether it’s birthdays, holidays, or everyday celebrations. Ideal for beginners and experienced bakers alike, they’re the go-to coating for creating eye-catching and delicious sweet creations.
- Wilton Treat Sticks – Sturdy lollipop sticks perfect for holding your cake pops securely.Wilton Treat Sticks are the perfect companion for making cake pops, chocolate-dipped fruits, marshmallow pops, and other handheld treats. Made from sturdy, food-safe paper, these sticks provide a reliable grip that keeps your desserts secure while adding a clean, professional look. They’re designed to withstand dipping and decorating without bending or breaking, making them ideal for beginners and seasoned bakers alike. Available in different sizes, Wilton Treat Sticks are versatile enough for party favors, dessert tables, or creative DIY projects. Whether you’re crafting festive cake pops or custom candy creations, these sticks make serving and enjoying your treats both fun and effortless.
- Silicone Cake Pop Mold – Helps shape uniform cake balls for beginners.A Silicone Cake Pop Mold is a beginner-friendly baking tool that makes creating perfectly shaped cake pops quick and effortless. Crafted from flexible, nonstick silicone, this mold ensures that your cake balls bake evenly and release smoothly without sticking or crumbling. Its lightweight, heat-resistant design makes it safe for use in the oven, microwave, or freezer, giving you plenty of versatility for different recipes. With multiple cavities in one mold, you can bake a whole batch of uniform cake pops at once, saving time and reducing mess. Easy to clean and reusable, a silicone cake pop mold is an essential kitchen accessory for anyone who loves making fun, bite-sized treats for parties, holidays, or everyday snacking.
- Wilton Decorating Sprinkles Variety Pack – Adds fun, colorful finishing touches to your treats.The Wilton Decorating Sprinkles Variety Pack is a fun and colorful way to take your desserts to the next level. Perfect for cake pops, cupcakes, cookies, and more, this pack offers a selection of sprinkles in different shapes, colors, and textures, giving you endless decorating possibilities. Whether you want to add a festive touch for holidays, birthdays, or everyday treats, these sprinkles make your creations look vibrant and professional with minimal effort. Conveniently packaged and easy to use, the variety pack allows you to mix and match styles to suit any theme or occasion. For bakers of all skill levels, the Wilton Decorating Sprinkles Variety Pack is an essential pantry staple for turning simple sweets into eye-catching delights.
- Microwave-Safe Melting Pot – Makes melting chocolate or candy coating fast and easy.A Microwave-Safe Melting Pot is a handy kitchen tool designed to make melting chocolate, candy melts, or butter quick and mess-free. Its heat-resistant material allows for safe use in the microwave, while the nonstick interior ensures smooth melting and easy cleanup. Many melting pots feature a flexible spout, making it simple to pour coatings directly onto desserts or dip cake pops without spills. Compact and convenient, it eliminates the hassle of double boilers and reduces the risk of burning chocolate. Perfect for beginners and home bakers, a microwave-safe melting pot is an essential accessory for effortless dipping, drizzling, and decorating sweet treats.
- Cake Pop Stand or Holder – Keeps pops upright while drying and makes for a neat display.A Cake Pop Stand or Holder is an essential accessory for displaying and drying cake pops with ease and style. Designed with multiple slots or holes, it keeps your pops upright and evenly spaced, ensuring the coating sets smoothly without smudges or flat spots. Perfect for parties, bake sales, or special occasions, a stand not only provides a neat way to showcase your creations but also adds a decorative touch to your dessert table. Many stands are reusable, lightweight, and easy to clean, making them a practical choice for both beginners and experienced bakers. With a cake pop stand or holder, your treats look professionally presented and are ready to impress guests.
- Reusable Piping Bags & Tips – Great for adding drizzles, swirls, or custom designs on your cake pops.Reusable Piping Bags & Tips are a must-have for anyone who loves decorating cakes, cupcakes, cookies, and cake pops with creativity and flair. Made from durable, food-grade materials, these eco-friendly bags are designed to withstand repeated use while providing excellent control for piping frosting, icing, or melted chocolate. Paired with interchangeable stainless steel tips, they allow you to create a variety of designs—from delicate swirls and rosettes to bold lettering and intricate patterns. Easy to clean and store, reusable piping bags save money and reduce waste compared to disposable ones. Whether you’re a beginner learning basic designs or an experienced baker adding fine details, reusable piping bags and tips make decorating both fun and professional-looking.