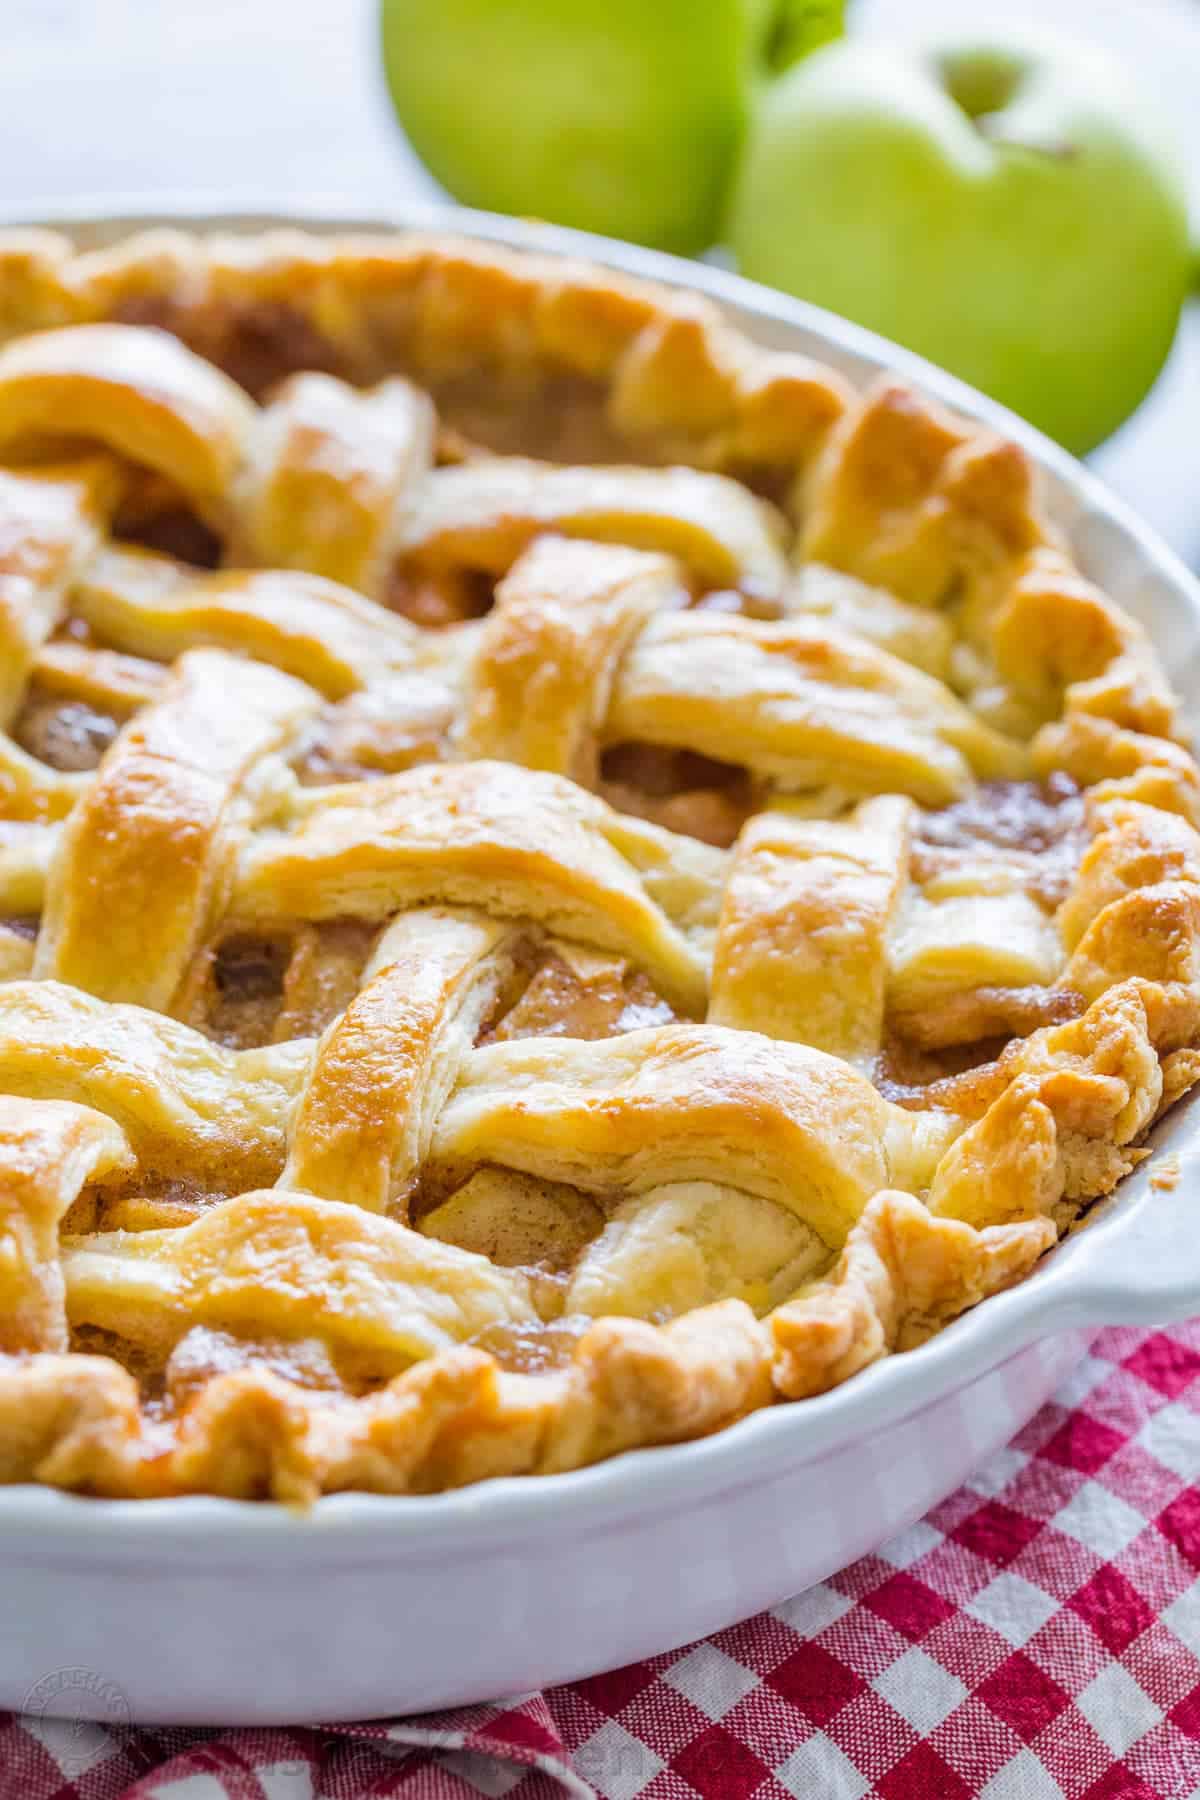
Apple Pie Welcome to our ultimate guide on baking the perfect All-American apple pie! If you’re craving that iconic dessert with a buttery, flaky crust enveloping tender, cinnamon-spiced apples in a sweet, bubbly filling, you’ve come to the right place. Often dubbed “as American as apple pie,” this treat symbolizes comfort, tradition, and homey goodness, making it a staple for Thanksgiving, Fourth of July picnics, or any cozy gathering. With its balance of tart apples, warm spices, and golden pastry, it’s a dessert that evokes nostalgia and satisfies every sweet tooth.
.From its surprising history to key ingredients, a step-by-step recipe, delicious \d. We’ll include internal links to complementary recipes on our site, like our classic chocolate chip cookies, peanut butter cookies, no-bake chocolate oatmeal cookies, bakery-style blueberry muffins, classic New York style cheesecake, or festive gingerbread cookies, and external links to reliable sources for deeper dives. Whether you’re a beginner tackling your first pie or an experienced baker refining your technique, this guide ensures a pie that’s golden, juicy, and free from common pitfalls like soggy bottoms or runny fillings.

Apple pie’s allure lies in its simplicity, yet mastering it requires attention to details like apple variety and crust handling. With prep time around 30 minutes, chilling for an hour, and baking in 45-60 minutes, you’ll have a showstopper ready to impress. Let’s slice into the secrets and get your kitchen smelling like autumn bliss!
Secret 1: The Surprising History of All-American Apple Pie
The phrase “as American as apple pie” might evoke images of stars, stripes, and Fourth of July barbecues, but the dessert’s origins are far from exclusively American. Apple pie’s history is a global tale of migration, adaptation, and cultural fusion, spanning centuries and continents.
Apples themselves aren’t native to North America; they originated in Central Asia, specifically modern-day Kazakhstan, where wild Malus sieversii trees still grow. Ancient civilizations like the Greeks and Romans cultivated apples, incorporating them into baked goods. The first recorded apple pie recipe dates back to 1381 in England, from a cookbook by the master cooks of King Richard II. This early version included apples, figs, raisins, pears, and saffron in a pastry “coffin” (a thick, inedible casing), without sugar due to its rarity and expense.
European settlers brought apple seeds and pie-making traditions to America in the 1600s. The first English colonists in Jamestown and Plymouth planted apple orchards, but early pies used native crabapples or imported dried fruits since cultivated apples took years to establish. By the 1700s, apple trees thrived, and pies became common in colonial households. However, these weren’t the sweet desserts we know; they were often savory or lightly sweetened, served as main courses.
The “All-American” label emerged in the 19th and 20th centuries. Amelia Simmons’ 1796 cookbook, American Cookery, featured the first printed apple pie recipes in the U.S., marking a shift toward distinctly American adaptations. As sugar became affordable and cinnamon/nutmeg imports increased, pies sweetened. During World War II, soldiers claimed they fought for “mom and apple pie,” cementing its patriotic status. The 1960s counterculture twisted the phrase ironically, but it endured as a symbol of Americana.
Regional twists abound: New England pairs pie with cheddar cheese, a nod to English traditions, while the South favors fried hand pies. Today, apple pie represents comfort and heritage, celebrated on National Apple Pie Day (May 13). For more on American dessert evolution, explore our history of American baking. Externally, Smithsonian Magazine delves into its un-American roots.
This history reveals apple pie as a borrowed delight, perfected in America through innovation and abundance.
Secret 2: Essential Ingredients for All-American Apple Pie
The foundation of a stellar All-American apple pie is quality ingredients that balance tartness, sweetness, and texture. Unlike denser European versions, American pie emphasizes flaky crust and juicy filling. Let’s dissect the essentials, their roles, and selection tips, drawn from classic recipes.
Crust:
- Flour: All-purpose (2 1/2 cups) for structure. Chill for flakiness; gluten-free blends work with adjustments.
- Fat: Butter (1 cup cold, cubed) for flavor, or mix with shortening (1/2 cup each) for tenderness. Cold fat creates steam pockets.
- Sugar and Salt: 1 tbsp. sugar, 1 tsp salt for balance.
- Liquid: Ice water (6-8 tbsp.) or vodka (half) for pliability without gluten development.
- Egg Wash: 1 egg beaten with water for golden shine.
Filling:
- Apples: 6-8 medium (about 3 lbs.), mix tart (Granny Smith) and sweet (Honeycrisp, Fuji) for flavor depth. Slice thinly (1/4-inch) to prevent gaps.
- Sugar: 3/4-1 cup granulated or brown for sweetness; adjust based on apple tartness.
- Spices: Cinnamon (1-2 tsp), nutmeg (1/4 tsp), allspice/cloves (optional) for warmth.
- Thickener: Flour or cornstarch (2-4 tbsp.) to bind juices; tapioca for clarity.
- Acid: Lemon juice (1-2 tbsp.) brightens and prevents browning.
- Butter: 2-4 tbsp. dotted for richness.
A typical recipe serves 8: Double crust with 2 1/2 cups flour, 1 cup butter, etc.; filling with 7 cups sliced apples, 3/4 cup sugar, 2 tbsp. flour, 1 tsp cinnamon, dash nutmeg, 1 tbsp. lemon juice.
Choose firm apples to hold shape; avoid Red Delicious (mushy). For premium flour, visit King Arthur Baking. These create a pie that’s juicy yet sliceable.
Secret 3: Step-by-Step Recipe for Classic All-American Apple Pie
Let’s bake! This classic All-American apple pie recipe yields a 9-inch pie with flaky crust and spiced filling, serving 8. It’s straightforward, with tips for success.
Prep Time: 30 minutes | Chill Time: 1 hour | Bake Time: 45-60 minutes | Total Time: 2.5 hours | Yield: 8 slices
Ingredients:
- Crust: 2 1/2 cups all-purpose flour, 1 tsp salt, 1 tbsp. sugar, 1 cup cold unsalted butter (cubed), 6-8 tbsp. ice water
- Filling: 6-8 apples (peeled, sliced), 3/4 cup sugar, 2 tbsp. flour, 1 tsp cinnamon, 1/4 tsp nutmeg, 1 tbsp. lemon juice, 2 tbsp. butter (dotted)
- Egg Wash: 1 egg + 1 tbsp. water
Instructions:
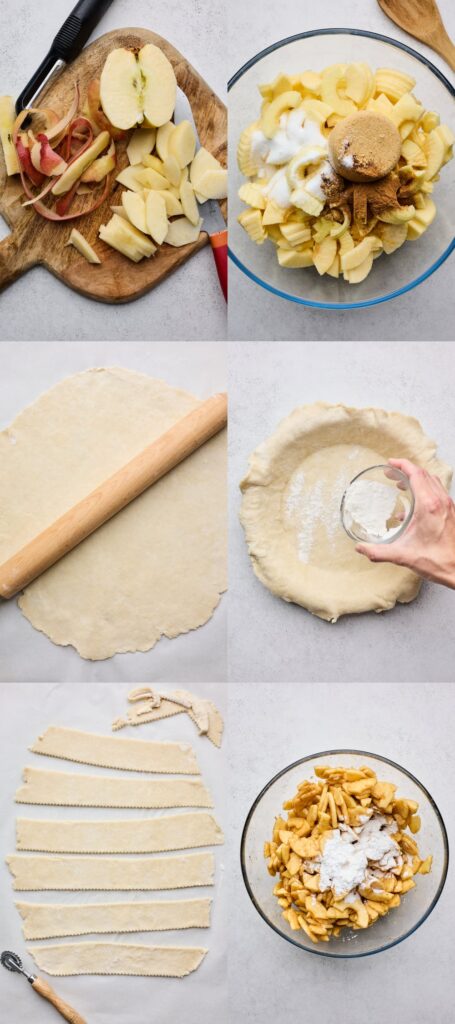
- Make Crust: Whisk flour, salt, sugar. Cut in butter until pea-sized. Add water gradually; form dough. Divide, wrap, chill 1 hour.
- Prep Filling: Toss apples with sugar, flour, spices, lemon. Let sit 30 minutes to release juices.
- Roll Bottom Crust: On floured surface, roll one disc to 12-inch circle. Fit into 9-inch pie plate; trim edges.
- Add Filling: Pile apples high; dot with butter. Drain excess juice if watery.
- Top Crust: Roll second disc. For lattice: Cut strips, weave over filling. For solid: Drape, vent slits, crimp edges.
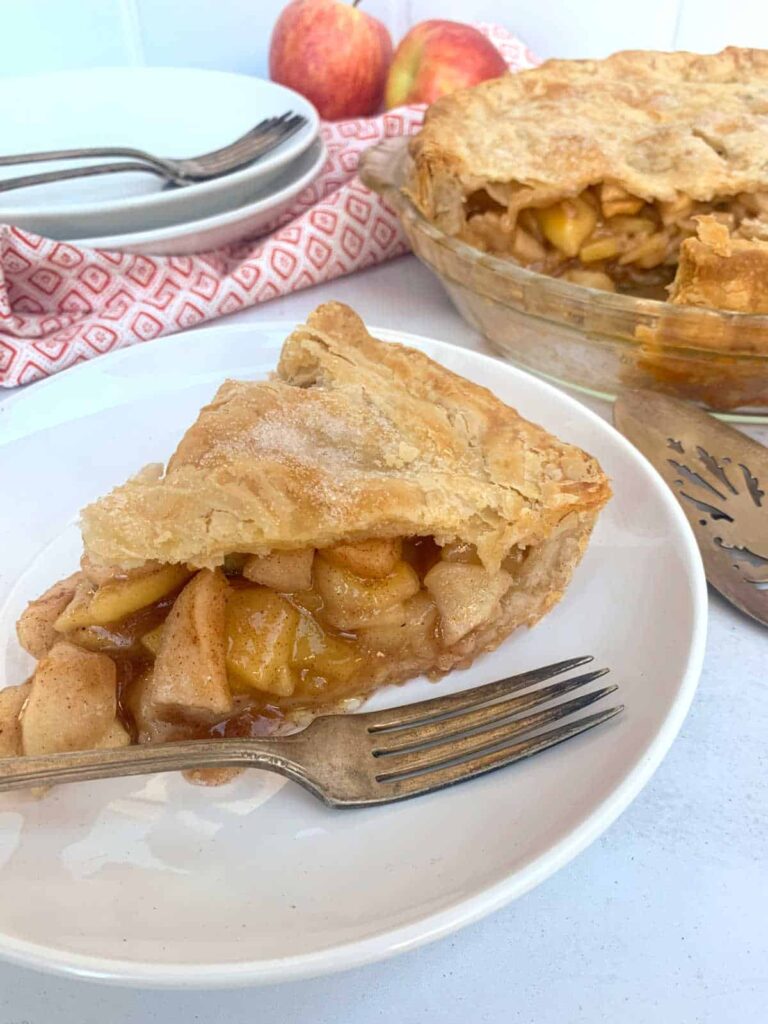
- Brush and Bake: Apply egg wash. Bake at 425°F 15 minutes, then 375°F 30-45 minutes until bubbly and golden. Cover edges if browning fast.
- Cool: At least 2 hours for set filling.
For visuals, see this tutorial. Pre-cook apples briefly for less shrinkage.
Secret 4: Delicious Variations to Try
Customize your All-American apple pie with these twists, from crust styles to add-ins.
- Dutch Apple Pie: Crumble topping (flour, sugar, butter) for streusel crunch.
- Caramel Apple: Drizzle caramel sauce in filling.
- Cheddar Crust: Mix cheese into dough for savory note.
- Hand Pies: Mini versions for portability.
- Gluten-Free: Almond flour crust.
- Skillet Pie: Bake in cast iron for rustic appeal.
- Mixed Fruit: Add cranberries or pears.
For inspiration, see Food & Wine’s list.
Secret 5: Pro Tips for Bakery-Quality Apple Pie
Perfect your pie with these insights:
- Cold ingredients for flaky crust.
- Mix apple varieties.
- Macerate apples to reduce liquid.
- Use pie shield for even browning.
- Bake on lower rack.
- Cool fully for clean slices.
Avoid sogginess by pre-cooking filling or venting well.
Secret 6: Storage and Serving Suggestions
Store covered at room temp 2 days, fridge 4-5 days; freeze up to 3 months. Reheat at 350°F.
Serve warm with ice cream, whipped cream, or cheddar. Pair with cider or coffee.
Secret 7: Nutritional Information and Healthier Options
Per slice (8 servings): ~400 calories, 18g fat (11g saturated), 58g carbs (4g fiber, 30g sugar), 4g protein.
Healthier: Reduce sugar, use whole wheat crust, add nuts for fiber.
Frequently Asked Questions
Q: Why is my crust soggy?
A soggy crust, particularly in the context of your All-American apple pie or similar desserts like those mentioned in your previous questions (e.g., microwave blackberry mug cobbler or vegan and gluten-free desserts), is a common baking issue that can detract from the perfect texture of a pie or tart. Drawing from the All-American apple pie guide and general baking principles, here are the primary reasons why your crust might be soggy and how to fix it, with connections to your earlier inquiries about crumbly desserts, rubbery cobbler, and cheesecake cracks where relevant.
Why Your Pie Crust is Soggy
- Excess Moisture from the Filling:
- Juicy fillings, like the apples in the All-American apple pie or berries in a cobbler, release water during baking, which can seep into the crust if not properly managed. This is especially true for fruit pies where the filling’s natural juices overwhelm the crust’s ability to stay crisp.
- Fix: Pre-cook or macerate the filling to release and reduce excess liquid. For apple pie, toss sliced apples (6-8 medium) with 3/4 cup sugar and let sit for 30 minutes, then drain the liquid before adding to the crust. Alternatively, cook the apples briefly on the stovetop (5-10 minutes) to evaporate some moisture, then cool before filling. Use a thickener like 2-4 tbsp flour or cornstarch to bind remaining juices. For mug cobblers, ensure 1 tsp cornstarch coats the blackberries to thicken their juices.
- Not Blind Baking the Crust:
- Without pre-baking (blind baking) the bottom crust, wet fillings can saturate it before it has a chance to set and crisp, especially in pies with long baking times like apple pie.
- Fix: Blind bake the bottom crust for 10-15 minutes at 425°F. After rolling out the dough and fitting it into the pie plate, dock it lightly with a fork (as discussed in your “fork marks” question) to prevent puffing, line with parchment, and add pie weights (or dried beans). Bake until lightly set, then remove weights and add filling. This creates a barrier against moisture.
- Improper Crust Composition:
- A crust with too little fat or too much water can absorb filling moisture too easily, leading to sogginess. Gluten-free crusts, as in the vegan and gluten-free desserts guide, are particularly prone if not balanced with enough fat or binders.
- Fix: Use the right fat-to-flour ratio—e.g., 1 cup cold butter (or half butter, half shortening) to 2 1/2 cups flour for a flaky pie crust. Keep water minimal (6-8 tbsp ice water) to avoid a doughy texture. For gluten-free crusts, add 1/4 tsp xanthan gum per cup of flour to improve structure and reduce water absorption. Ensure fat is cold and cut into pea-sized pieces for flakiness.
- Underbaking the Crust:
- If the crust doesn’t bake long enough to set fully, it can remain soft and absorb moisture from the filling, especially in a double-crust pie like apple pie where the top crust traps steam.
- Fix: Bake at the correct temperature (425°F for 15 minutes, then 375°F for 30-45 minutes) until the crust is golden and the filling bubbles through vents. Place the pie on the lower oven rack to ensure the bottom crust gets direct heat. Use a glass or metal pie dish for better heat conduction compared to ceramic. Check that the filling reaches about 200°F internally for proper thickening.
- Lack of Ventilation:
- In double-crust pies, insufficient steam vents (or no slits in the top crust) trap moisture, causing the bottom crust to steam rather than crisp, leading to a soggy texture. This ties to your “fork marks” question, where docking helps release steam in some contexts.
- Fix: For a double-crust apple pie, cut 4-6 slits or decorative vents in the top crust to allow steam to escape. Alternatively, use a lattice crust for maximum ventilation, as suggested in the apple pie variations. Ensure the top crust is sealed properly to the bottom to prevent filling leakage.
- Microwave-Specific Issues (Mug Cobbler):
- If you’re adapting the microwave blackberry mug cobbler to include a crust-like base (or troubleshooting a soggy topping), the microwave’s high moisture environment can prevent crisping, as it cooks by steaming rather than dry heat. Excess berry juice can also soak the topping.
- Fix: Ensure the blackberries are coated with 1 tsp cornstarch and microwaved briefly (30 seconds) to thicken juices before adding the topping. Use a minimal amount of milk (2 tbsp) in the topping to avoid a wet batter. Microwave in a large (12 oz+) mug and check at 1.5 minutes to prevent overcooking, which can make the topping soggy rather than cakey.
- Improper Cooling:
- Cooling the pie too quickly or in a humid environment can trap condensation, softening the crust. This is similar to issues with cheesecake cracks (from your previous question), where temperature changes cause structural problems.
- Fix: Cool the pie on a wire rack for at least 2 hours at room temperature to allow steam to escape gradually before refrigerating. Avoid covering the pie tightly while warm, as this traps moisture.
Q: Best apples? A: Mix Granny Smith and Honeycrisp.