Peanut Butter Cookies to our in-depth guide on baking perfect peanut butter cookies! If you’re craving that irresistible combination of nutty flavor, tender texture, and a hint of sweetness, you’ve landed on the right page. Peanut butter cookies are a timeless classic, evoking memories of childhood kitchens and holiday bake sales. They’re simple to make yet endlessly customizable, making them ideal for beginners and experienced bakers alike. In this comprehensive article, we’ll reveal 7 essential secrets to mastering these cookies, drawing from historical roots, proven recipes, and pro techniques.
We’ll explore the rich history of peanut butter cookies, Peanut Butter Cookies break down key ingredients, provide a foolproof step-by-step recipe, offer exciting variations, share baking tips, discuss storage and serving ideas, delve into nutritional aspects, and answer frequently asked questions. Along the way, we’ll include internal links to related content on our site, such as our classic chocolate chip cookies or nutty oatmeal treats, and external links to reliable sources for further inspiration. With a prep time of just 10 minutes and baking in under 15, you’ll have warm, fork-marked cookies ready to enjoy in no time.
Whether you’re baking for a family gathering, a quick snack, or to stock your cookie jar, this guide will equip you with the knowledge to create bakery-quality results at home. Peanut Butter Cookies Let’s dive into the nutty world of peanut butter cookies and uncover the secrets that make them unforgettable!
Secret 1: The Fascinating History of Peanut Butter Cookies
The modern peanut butter cookie emerged in the 1920s and 1930s, coinciding with the commercialization of peanut butter by brands like Skippy and Peter Pan. The iconic crisscross fork pattern, which flattens the dense dough and prevents puffing, is believed to have originated around this time to distinguish peanut butter cookies from others. By the 1930s, recipes appeared in cookbooks like Ruth Wakefield’s (of Toll House fame), but it was during the Great Depression and World War II that they soared in popularity. Peanuts were inexpensive and nutritious, making them a go-to ingredient for rationed households. A classic WWII recipe even humorously called them “AWOL – a welcome addition to guardhouse rations,” emphasizing their morale-boosting role.
Post-war, peanut butter cookies became a staple in American homes, thanks to Betty Crocker’s cookbooks in the 1950s and 1960s, which featured simple, reliable recipes. The 1940s saw the traditional fork marks become standard, as noted in various historical accounts, turning the cookie into a visual icon. Today, variations abound, from gluten-free to vegan, reflecting evolving dietary trends. For more on nut-based desserts, check our history of American baking. Externally, Taylor Chip offers a detailed look at the cookie’s evolution.
This history highlights how peanut butter cookies transitioned from a practical crop promotion to a beloved comfort food. Peanut Butter Cookies adaptability has kept them relevant, appearing in everything from school lunchboxes to gourmet bakeries.
Secret 2: Essential Ingredients for Peanut Butter Cookies
The magic of peanut butter cookies lies in their minimalism—most recipes use just a handful of pantry staples. Understanding each ingredient’s role ensures consistent results. Let’s dissect them for a deeper appreciation.
- Peanut Butter: The star ingredient! Creamy peanut butter provides richness and moisture; crunchy adds texture. Opt for natural varieties without added oils for purer flavor, but stir well to incorporate separated oils. Avoid low-fat options, as they can make cookies dry.
- Sugar: Granulated sugar adds sweetness and crispiness, while brown sugar contributes chewiness and a caramel note. Many recipes use a mix; for softer cookies, increase brown sugar.
- Eggs: One or two large eggs bind the dough and add structure. Room-temperature eggs blend smoothly. For egg-free, use flax eggs (1 tbsp ground flax + 3 tbsp water).
- Flour: All-purpose flour gives structure. Measure accurately to prevent crumbly dough. Gluten-free blends work for adaptations.
- Baking Soda: This leavening agent helps cookies spread and rise slightly. Fresh soda is key—test with vinegar for fizz.
- Salt: Enhances nutty flavors. Use kosher or sea salt; a pinch on top adds a gourmet touch.
- Vanilla Extract: Pure vanilla rounds out sweetness, though optional in basic recipes.
A classic 3-ingredient version: 1 cup peanut butter, 1 cup sugar, 1 egg. For fuller flavor, add flour and baking soda as in King Arthur’s recipe. For quality sourcing, visit King Arthur Baking.
These ingredients create a dense, flavorful dough. Peanut Butter Cookies Experimenting with ratios tweaks texture—from crumbly to chewy.
Secret 3: Step-by-Step Recipe for Classic Peanut Butter Cookies
Ready to bake? This easy peanut butter cookie recipe is foolproof, yielding soft centers with crispy edges. Based on time-tested methods, it’s quick and customizable.
Prep Time: 10 minutes | Cook Time: 10-12 minutes | Total Time: 25 minutes | Yield: 24 cookies
Ingredients:
- 1 cup creamy peanut butter
- 1/2 cup unsalted butter, softened
- 1/2 cup granulated sugar
- 1/2 cup brown sugar
- 1 large egg
- 1 tsp vanilla extract
- 1 1/4 cups all-purpose flour
- 1/2 tsp baking soda
- 1/4 tsp salt
- Additional sugar for rolling
Instructions:
- Preheat Oven: Set to 350°F (175°C). Line baking sheets with parchment.
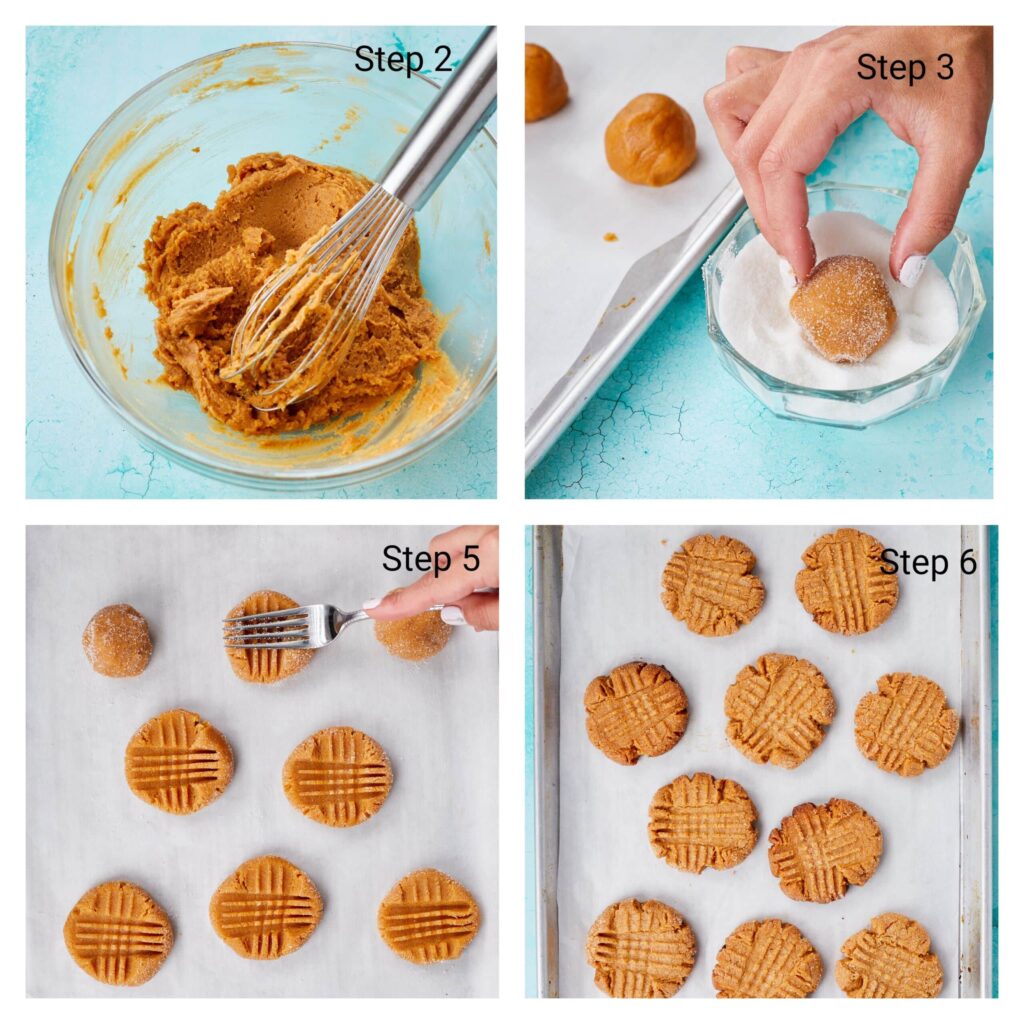
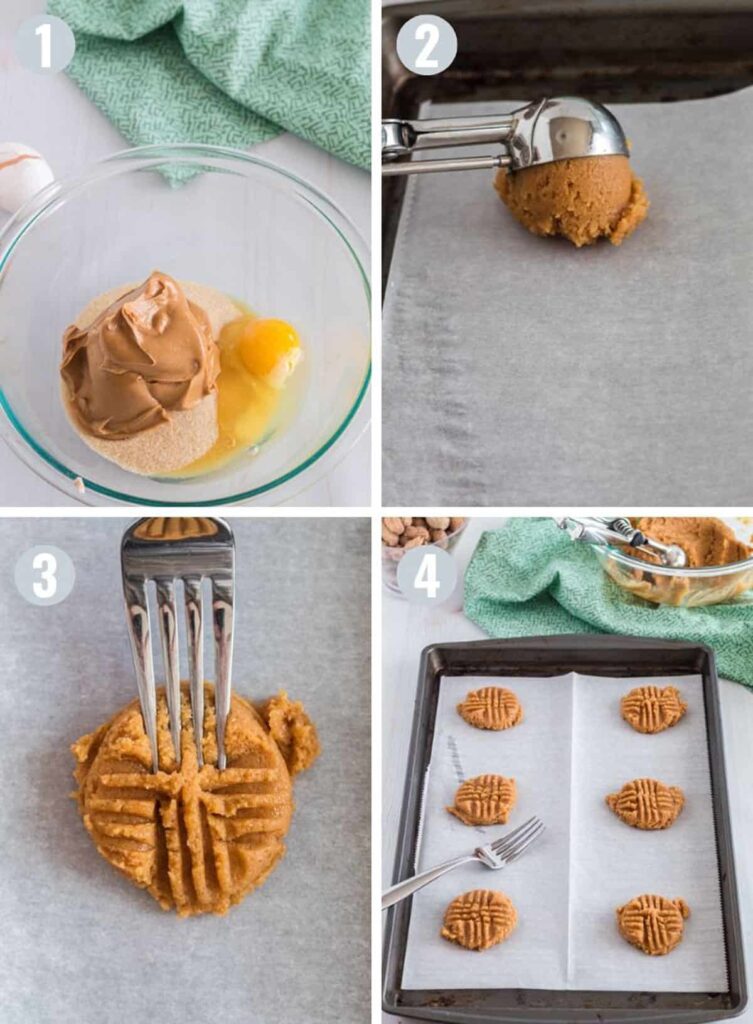
- Cream Butters and Sugars: Beat peanut butter, butter, granulated sugar, and brown sugar until fluffy (2-3 minutes).
- Add Egg and Vanilla: Mix in egg and vanilla until smooth.
- Combine Dry Ingredients: Whisk flour, baking soda, and salt; stir into wet mixture until just combined.
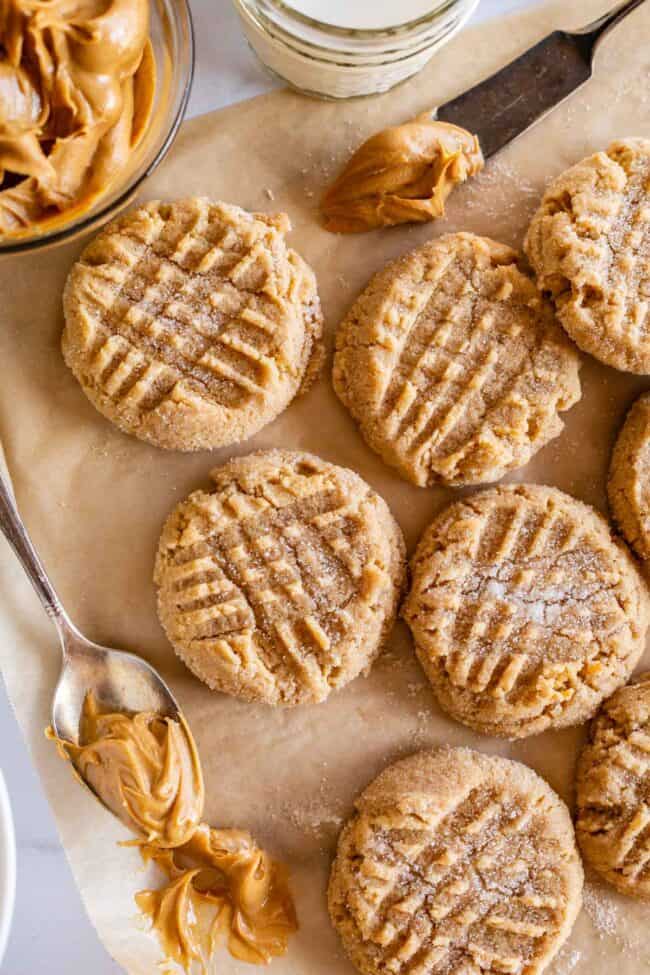
- Shape Dough: Roll 1-tbsp balls in sugar, place on sheets 2 inches apart.
- Fork Pattern: Flatten with fork tines in crisscross pattern.
- Bake: 10-12 minutes until edges set. Cool on sheet 5 minutes, then rack.
For visuals, see this tutorial. Underbake for chewiness.
Secret 4: Delicious Variations to Try
Elevate your cookies with these twists:
- Chocolate Chip Peanut Butter: Add 1 cup chips.
- 3-Ingredient Simple: Peanut butter, sugar, egg—minimalist delight.
- Vegan: Use maple syrup, flax egg, vegan PB.
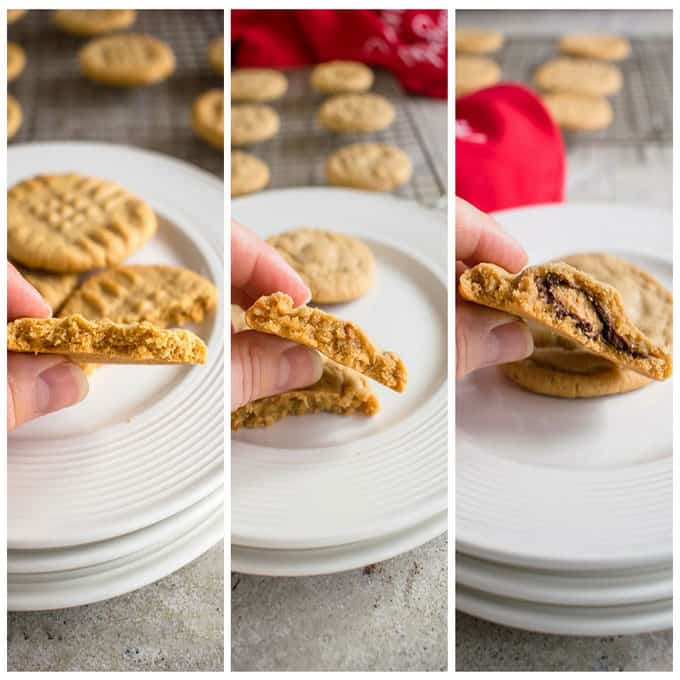
- Thumbprint: Fill centers with jam or chocolate.
- Oatmeal Peanut Butter: Add oats for heartiness, like our oatmeal cookies.
- Stuffed: Wrap dough around chocolate pieces.
- Gluten-Free: Use almond flour blend.
For more, see Kitchn’s reviews in Peanut Butter Cookies.
Secret 5: Pro Tips for Flawless Cookies
- Use room-temp ingredients.
- Don’t overmix.
- Chill dough if spreading.
- Fork dip in sugar to prevent sticking.
- Bake on middle rack.
From historical homemakers.
Secret 6: Storage and Serving Suggestions
Store in airtight container for 5-7 days. Freeze up to 3 months. Serve with milk, in ice cream sandwiches, or crumbled over yogurt.
Secret 7: Nutritional Information and Healthier Twists
Per cookie: ~150 calories, 8g fat, 15g carbs, 3g protein. Use natural PB for less sugar. Healthier: Swap sugar with honey, add nuts for fiber.
Consult USDA for details.
Frequently Asked Questions
Why Fork Marks Are Used in Baking
- Preventing Air Bubbles and Puffing:
- When a pie crust (or other pastry) bakes, steam from the dough’s moisture or filling can get trapped beneath, causing the crust to puff up unevenly or form air bubbles. This is especially true for single-crust pies (like pumpkin) or blind-baked crusts where no weighty filling presses down the dough.
- Purpose: Fork marks create small holes for steam to escape, ensuring the crust stays flat and even, preventing doming or cracking that could lead to an uneven or crumbly texture.
- Example: In the All-American Peanut Butter Cookies recipe, docking the bottom crust before adding the apple filling helps maintain a uniform base, especially if pre-baking (blind baking) is used to avoid a soggy bottom.
- Ensuring Even Baking:
- Fork marks allow heat to penetrate the dough more evenly, reducing the risk of undercooked spots in thicker crusts. This is crucial for desserts like pies where a soggy or raw base ruins the texture.
- Purpose: The holes help the crust bake consistently, especially in a double-crust pie (like the apple pie) where the bottom crust might otherwise steam instead of crisp due to the juicy filling.
- Aesthetic and Structural Control:
- In some cases, fork marks are used decoratively or to mark specific areas of the crust (e.g., edges) to control how it rises or shrinks during baking. For example, docking the edges of a pie crust can prevent it from pulling away from the pan.
- Purpose: They provide a controlled way to manage dough expansion, maintaining the desired shape and presentation, which is key for a polished All-American Peanut Butter Cookies
- Common in Blind Baking:
- When blind baking (pre-baking the crust without filling, often with weights like beans or rice), fork marks are essential to prevent the crust from ballooning up, which could distort its shape or make it crumbly when filled later.
- Purpose: Docking ensures the crust stays in place, especially for delicate desserts like tarts or the True Gold Petit Baklava Entremets if adapting a pastry base.
Why Fork Marks Might Relate to Your Crumbly Desserts
Since you recently asked about crumbly desserts and a rubbery microwave blackberry mug cobbler, fork marks might also be relevant if you’re adapting recipes (e.g., making a mini pie-like version of the cobbler or troubleshooting a crumbly crust). If the topping or base of your dessert is crumbly, improper docking (or lack thereof) could contribute indirectly:
- Undocked Crust: If you’re making a pie or tart and didn’t prick the crust, trapped steam could cause uneven baking, leading to a dry or cracked texture that crumbles easily.
- Overdocking: Pricking too deeply or too much can weaken the structure, especially in gluten-free or vegan doughs (as in the vegan and gluten-free desserts guide), causing it to break apart.
How to Apply Fork Marks Effectively
- Technique: Use a fork to prick the dough surface evenly, spacing holes about 1/2 inch apart. For pie crusts, focus on the bottom and sides, avoiding the edges if crimped decoratively. Don’t pierce all the way through to prevent filling leakage.
- When to Dock: Dock before blind baking or adding wet fillings (like apples in the All-American Peanut Butter Cookies). For mug cobblers, docking isn’t typical, but if you’re layering a dough-like topping thickly, a light prick can help steam escape.
- Tools: A fork is standard, but a docking roller (a spiked tool) works for larger surfaces. For delicate desserts, use a toothpick for smaller holes.
Fixes for Crumbly Desserts Related to Fork Marks
If your crumbly desserts are tied to a crust or pastry base (e.g., adapting the mug cobbler into a mini pie or using a crust from the All-American apple pie recipe):
- Balance Docking with Moisture: Overdocking can dry out the crust, especially in gluten-free recipes. Ensure enough fat (butter or oil) in the dough—e.g., 1 cup cold butter for a pie crust or 1 tbsp in a cobbler topping—to keep it tender.
- Check Baking Time: Overbaking after docking can exacerbate crumbliness. For pies, bake at 425°F for 15 minutes, then reduce to 375°F for 30-45 minutes, checking for golden color.
- Gluten-Free Adjustments: In recipes like those in the vegan and gluten-free desserts guide, add 1/4 tsp xanthan gum per cup of gluten-free flour to improve cohesion, reducing crumbling even with docking.
- Avoid Overdocking: If the crust is too perforated, it may weaken and crumble. Prick lightly, just enough to pierce the surface.
Tips to Prevent Crumbling and Optimize Fork Marks
- Chill Dough: For pie crusts, chill the dough for 1 hour before docking to firm it up, reducing shrinkage and crumbling.
- Use Weights for Blind Baking: After docking, line the crust with parchment and add pie weights or dried beans to keep it flat, ensuring even baking without cracks.
- Test Doneness: For pies, check the filling at 200°F internally to avoid overbaking the crust, which can make it brittle. For mug cobblers, ensure the topping is slightly soft post-microwaving.
- Moisture Balance: In wet fillings like blackberries or apples, drain excess juice or use a thickener (1 tsp cornstarch for cobbler, 2-4 tbsp for pie) to prevent a soggy base that might crumble later.
Q: Can I use crunchy PB? A: Yes, for texture.
Q: Flat cookies? A: Chill dough.
Q: Vegan possible? A: Yes, with substitutes.